and Hong Kong is relatively quite
in terms of shops opening and doing
their regular business.
seemed getting back to normal today though :wink:
though, it is definitely festive
with families roaming around and
paying their relatives visits and
sharing cookies, cakes and tea
Last night, a mahjong was being enjoyed
by my landlady's in-laws as I arrived
from dinner.
The whole day of Sunday was hectic
for me though.
After breakfast, I started building another diorama.
This time, since the “brown” fiasco
of the warehouse scene with the “weathered”
Shelby Cobra 429, I bought on Saturday night
a small bottle of Mr. Hobby Copper to experiment
with.
I haven’t really done an acceptable-to me, that is-
weathered look. But this time I am satisfied
with how the whole diorama turned out.
Again please bear with me, my pictures and the
process in building “Weather” You Like It Or Not”
Ingredients:
1. 1 pc.1:43 Chevrolet Camaro by Road Champs
2. 1 pc. A2 size White Cardboard
3. 2 pc A4 5 mm Foam Board
4. 28 mm x 14.5 mm Acrylic Case
5. Mr. Hobby Acrylic Paints(copper, red, yellow, black and white-basic colors)
6. #1,#2 and #5 Flat Paint Brushes, 1 of each
7. 1 Tumblers
8. 1 Rubber Cutting Mat
9. 1 UHU and 1 Elmer’s Glue
10. Pen and Paper
11. Steel Ruler
12. Cutter
13. X-Acto Knife
14. Water
15. A pair of Scissors
16. 3 mm Stainless Steel Wire
17. fine grain sand for hobbyists
18. toothpick
THE BASE
Start off with a sketch as usual
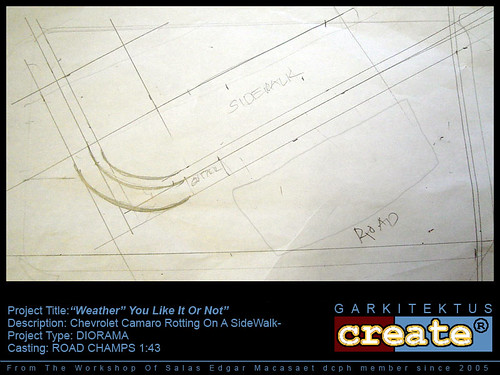
I am not comfortable with the roads being parallel
to the base of the diorama, that’s why I often, if not
always, draw the road at and angle with reference
to the line of the base. In this manner, I don’t need to
move my head too much in order to view the diorama.
Although the pictorial of this one took around 6 hours
from yesterday including this morning’s revisions, trying out
every possible angle I can think of, the diorama building
itself was 7 hours in total.
The 2-way road is 6.0 meters in width (approx. 15cms from
your steel ruler in1:43 scale) but I only showed half since the car
will only be on one side and I don’t intend to place
a second car passing by it (which is probably another idea
by the way).
The pavement/sidewalk is 1.6 meters wide ( around 4 cms form
your ruler) there are seldom sidewalks that are paved with
tiles but I thought it was to be a “neat” detail in this scene.
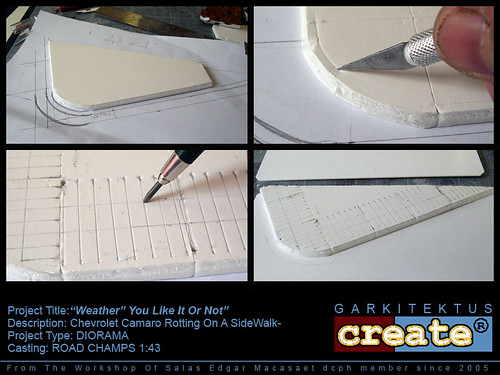
Cut this sidewalk out from the foam board-which is 5mm thick
that is around 200 mm in 1:43 scale.
Use your x-acto knife to cut grooves for the “concrete” segments
and pacing tile pattern. This will be very realistic when painted
as the paint will seep through.
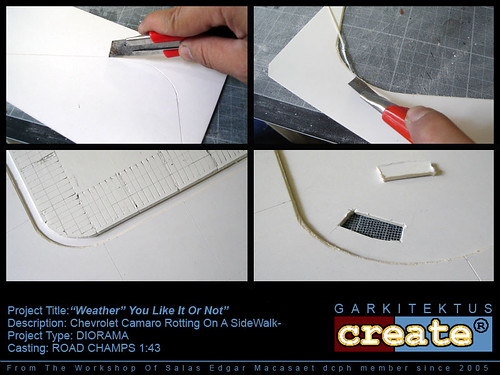
Cut out 2 pieces of white cardboard based from dimensions acrylic base.
Cut out the road and chop the edge at 45 degrees downward. This is for
the gutter line. Cut a hole for the drainage as well.
It is very important not to miss small details in building
a diorama because this will add to the realism of your work.
For the drain grill opening, cut out a third of the thickness of
the foam board 1.5 cm through. Get your toothpick (used or not :lol: ), and cut
several pieces of around 3.5 mm long and glue these on the underside
of the cutout foam board.
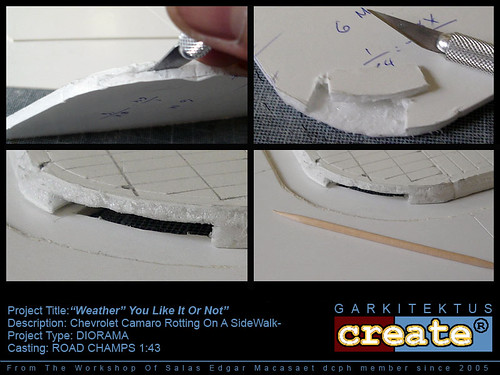
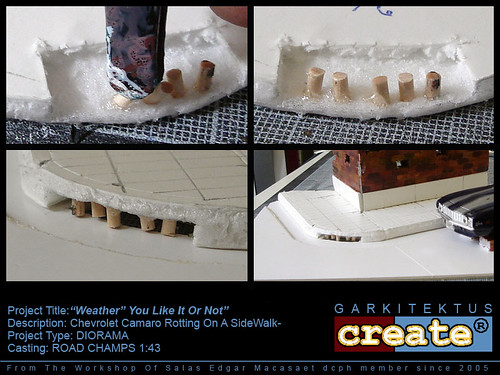
Test the view of your diorama every now and then to check
the progress. This will determine whether you are on the
right track or not.
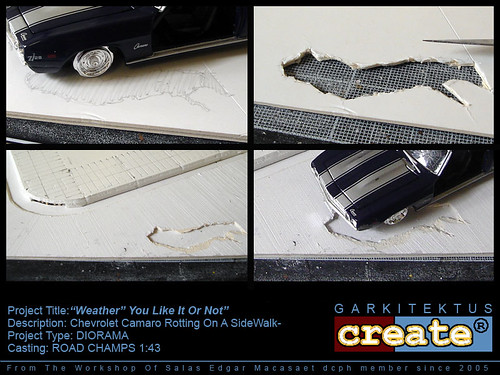
For a road detail, sketch a hole with your pencil and cut this out
from the cardboard.
THE PAINTING
Get your black paint and apply on the toothpick and all over the
underside of the drainage grille.
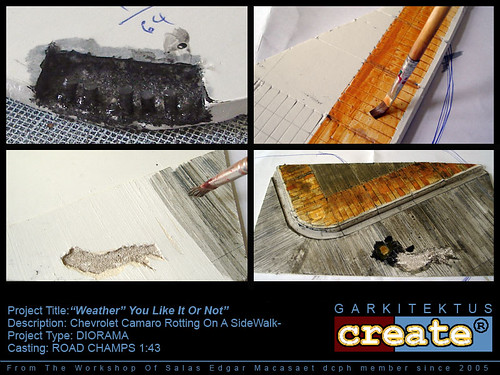
Mix red yellow white and black and you’ll get the color for the
pavement tiles. Apply this color using lots of water for that
washed look.
For the road, remember to scour the cardboard with your knife several
lines. This is for the “walis tingting” effect used in concrete roads
to prevent a slippery surface during rainfall.
Use considerable amount of water to apply the grayish green color
of concrete. By dropping a blob of black paint on to the still
wet concrete color, you may have that oil drip look on the road.
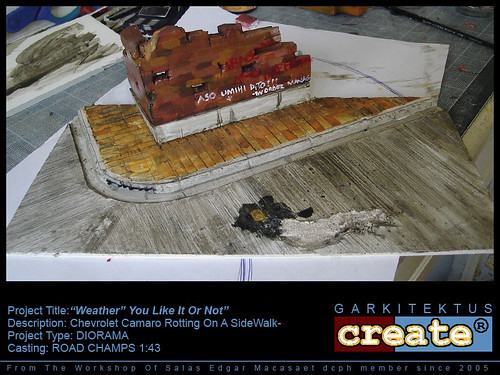
The wall is made up of 2 5mm thick foam board stuck together.
The same scouring techniques were used to make the groove lines
Of the brick tiles. A little graffiti here and there will help in that
rundown scene. ( I noticed something wrong with the “no pissing”
warning so I edited it , changing all the 50 shots I laid
out last night)
Then you will have something like this.
For the rust effect (I must read something about this in order to
hone my techniques), I used Mr Hobby Copper Color.
Scratch the car with a precision screwdriver. Do not blow away
the paint shavings as this will help in the effect you are achieving.
Apply the copper paint on the scratch area going a bit blurred outwards.
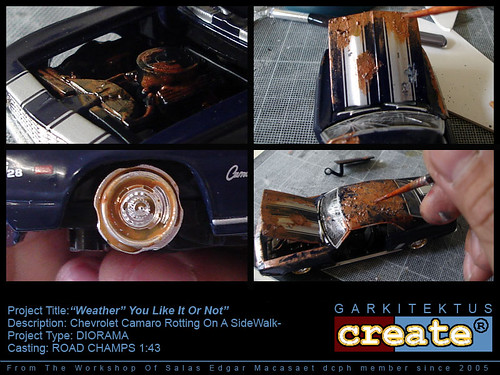
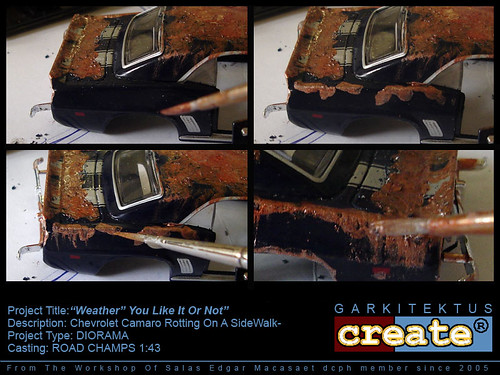
I guess a rusting effect will work well on a light colored car but
this will do for the moment.
After all of the above, the tedious task of photography is next.
I used several lighting source for this.
Natural, fluorescent, flashlight, and white lamp.
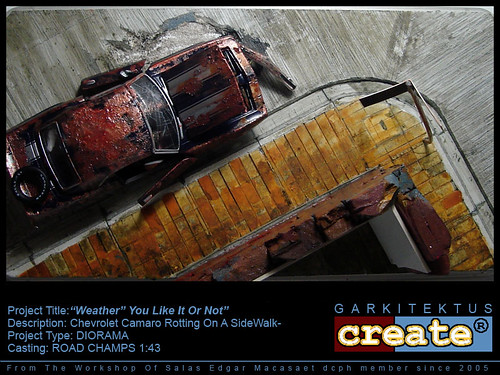
i hope you enjoyed it.
This diorama is owned by Atty Vic de los Angeles.
No comments:
Post a Comment